
Underground Oil Tank Removal on Long Island
Underground oil tanks are common in older homes, primarily for heating purposes. They are often made of steel, which makes them prone to corrosion over time. The American Petroleum Institute notes that these tanks typically start corroding and leaking after about 20 years, posing significant environmental risks.
Why Remove an Underground Oil Tank?
- Environmental Protection: Leaking tanks can contaminate soil and groundwater, which is costly to remediate and poses health risks.
- Real Estate Marketability: Homes with underground oil tanks can be challenging to sell due to potential liabilities. Buyers and lenders are often wary of the risks associated with old tanks.
- Insurance and Financial Incentives: Removing an underground oil tank can lead to lower homeowner’s insurance premiums. Some states offer grants or financial assistance for tank removal, particularly if the homeowner meets certain income requirements.
Steps to Removing an Underground Oil Tank
- Initial Assessment: Before removal, an environmental professional should assess the tank to determine its condition and any potential contamination.
- Hire a Licensed Contractor: It’s essential to engage a licensed and experienced environmental contractor. They will handle the necessary permits, inspections, and the actual removal process.
- Obtain Permits: Local municipalities require specific permits for tank removal. The contractor will typically manage this process, ensuring all legal requirements are met.
- Tank Removal: The contractor will excavate the area around the tank, safely remove it, and dispose of it according to environmental regulations. If there is any soil contamination, it will also need to be removed and properly disposed of.
- Soil Testing and Remediation: After the tank is removed, soil testing is crucial to ensure there are no remaining contaminants. If contamination is found, a remediation plan will be implemented to clean the affected area.
- Inspection and Documentation: Once the removal and remediation are complete, a final inspection by local authorities will ensure compliance with environmental regulations. Documentation of the entire process is essential for future property transactions.
Underground Oil Tank Removal Costs and Considerations
The cost of removing an underground oil tank can vary significantly based on several factors:
- Tank Size and Condition: Larger or severely corroded tanks may be more expensive to remove.
- Extent of Contamination: If significant soil contamination is found, remediation costs can increase.
- Geographic Location: Costs can vary by region, depending on local regulations and market rates for environmental services.
Potential Financial Assistance
Homeowners might be eligible for financial assistance or grants to help cover the cost of tank removal. These programs often have specific eligibility requirements, such as income limits or the presence of environmental hazards. It’s advisable to check with local government agencies or environmental organizations for available programs.
Pre-Removal Preparation
Removing an underground oil tank requires careful preparation. Key tasks include locating the tank, testing the soil for contamination, and securing necessary permits.
Locating the Tank
First, we need to identify the exact location of the underground oil tank. This can be done by reviewing property records and blueprints. If these documents are unavailable, ground-penetrating radar (GPR) or metal detectors can help locate the tank.
Certain homes may have visible filler pipes or vent pipes, which can also guide us to the tank’s location. It’s essential to accurately pinpoint the tank to avoid unnecessary excavation and potential hazards.
Soil Testing
Once the tank is located, conducting soil testing around the tank area is crucial. This process helps us determine if any leakage has occurred, potentially contaminating the soil. We will take soil samples at different depths and send them to a laboratory for analysis. The test results will indicate the presence of oil or other hazardous substances, guiding us on the required remediation steps.
Obtaining Necessary Permits
Before starting the removal process, we will obtain the necessary permits from local authorities. This step ensures that we comply with environmental regulations and safety standards. We will need to submit detailed plans and possibly undergo site inspections. Having the correct permits in place not only legitimizes the process but also protects from legal complications.
The Underground Oil Tank Removal Process
Removing an underground oil tank involves several critical steps. These include ensuring safety, draining the tank, and excavating it from the ground.
Safety Procedures
We need to check for underground utilities using professional services to prevent accidental damage during excavation. Proper signage and barriers can prevent unauthorized personnel from entering the work area.
Oil Tank Draining
The next step involves draining the remaining oil from the tank. This process reduces the risk of spillage and environmental contamination. We use specialized pumps to remove the residual oil safely.
We store the oil in approved containers for proper disposal or recycling. It’s critical to ensure that the tank is completely drained before moving to the next step. Residual oil can pose hazards and environmental risks.
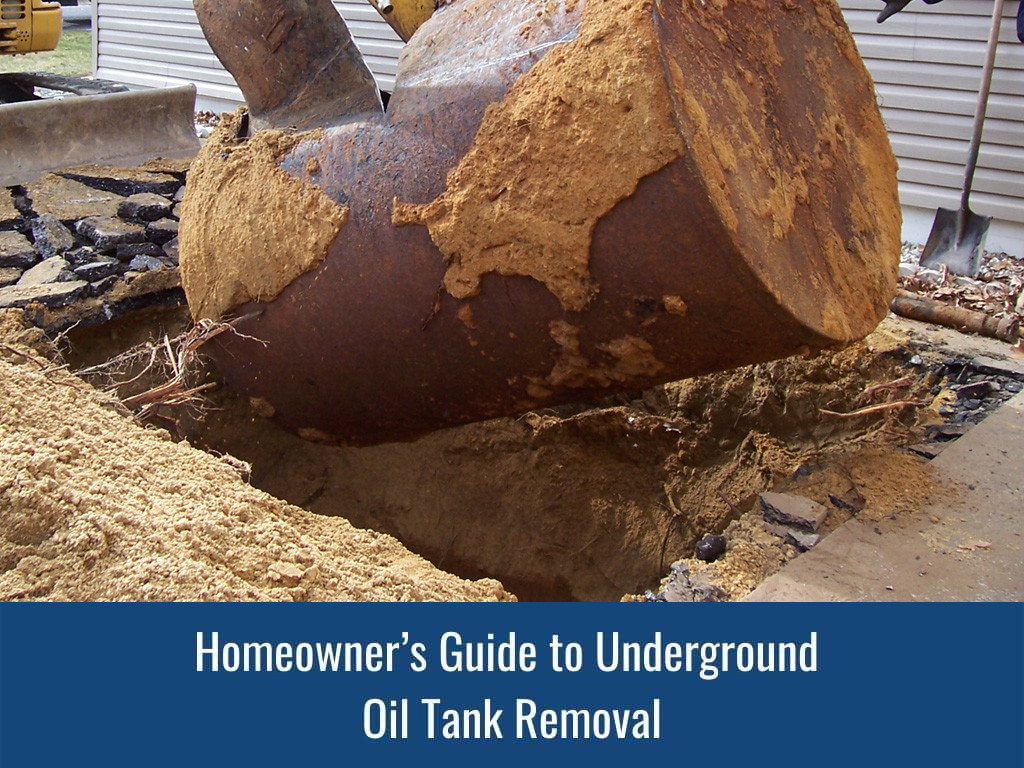
Excavation and Removal
Excavating the oil tank requires heavy equipment. We begin by marking the area around the tank to establish a clear excavation boundary. This helps prevent unintended damage to surrounding structures and landscapes.
We then use excavators to carefully remove the soil covering the tank. Ensuring the tank is intact during removal is crucial to avoid any punctures which can lead to leaks.
Once exposed, the tank is lifted out of the ground and prepared for transport. The excavation site and surrounding soil are tested for contamination to determine if further remediation is needed.
Post-Removal Process
After we remove the underground oil tank, our next steps focus on site cleanup and proper disposal of the tank. These steps are crucial to ensure that the area is safe and environmentally compliant.
Site Cleanup
We start by inspecting the excavation site to check for any remaining oil contamination. Contaminated soil must be removed and treated or disposed of at a licensed facility. This step ensures that the soil and groundwater are not polluted.
Next, we backfill the excavation site with clean soil. We compact the soil in layers to prevent future settling. It’s essential to restore the site to its original state as much as possible, maintaining both safety and aesthetic standards.
Finally, we plant grass or other vegetation if necessary. This not only stabilizes the soil but also helps blend the area back into the surrounding landscape.
Oil Tank Disposal
Disposal of the old oil tank is a regulated process. First, we thoroughly clean and de-gas the tank to eliminate any remaining oil or vapors. This step is critical to prevent any potential fire hazards.
After cleaning, the tank is either recycled or taken to a disposal facility. Recycling involves cutting the tank into smaller pieces, which are then processed as scrap metal. This option is eco-friendly and helps in reducing waste.
If the tank cannot be recycled, we ensure it is disposed of at a licensed facility that handles hazardous materials. This ensures that all environmental regulations are met, and there is no further risk to public safety.
Preventing Future Issues With Underground Oil Tanks
For homeowners transitioning from oil heating systems, consider the following:
- Switch to Alternative Energy Sources: Converting to natural gas, electric, or other heating systems can be more environmentally friendly and reduce future risks.
- Regular Maintenance: If retaining an oil heating system, regular maintenance and inspection of above-ground tanks are crucial to prevent leaks and prolong their lifespan.
Removing an underground oil tank is a significant but necessary step for many homeowners. It ensures environmental protection, maintains property value, and can potentially provide financial savings through reduced insurance premiums and available grants. Always engage qualified professionals such as Domino’s Oil Tank Service to manage the removal process and comply with all legal and environmental regulations.
Frequently Asked Questions
Underground oil tank removal involves specific steps, regulatory compliance, and cost considerations. Professional selection and understanding environmental impacts are crucial.
What are the steps involved in removing an underground oil tank?
First, obtain necessary permits. Next, schedule an inspection to check for leaks. Then, drain any remaining oil and excavate the tank. Finally, clean up any contamination and backfill the excavation site.
Are there alternatives to removing an underground oil tank?
Yes, alternatives include decommissioning the tank in place by cleaning and filling it with an inert material. This method might be more cost-effective depending on the local regulations and the tank’s condition.
What regulations apply to oil tank removal on Long Island?
On Long Island, homeowners must comply with state and local regulations. You need to secure permits, follow specific procedures for inspection and removal, and ensure proper disposal of the tank and any contaminated soil.
How should homeowners select a professional for underground oil tank removal?
Choose a licensed and insured professional with experience in oil tank removal such as Domino. Verify their credentials, ask for references, and ensure they follow state and local regulations.
What are the potential environmental impacts of an underground oil tank?
Leaking oil tanks can contaminate soil and groundwater, posing environmental and health risks. It is crucial to address any leaks promptly and remediate contaminated soil to prevent further environmental damage.
What are the average costs associated with underground oil tank removal?
Underground oil tank removal costs vary depending on the tank’s size, location, and any contamination present. On average, homeowners might expect to pay between $1,500 and $3,000 for removal. Extra costs may arise if soil contamination is discovered.
For further information and assistance, contact us today at 631-881-4772.